第二部分开始填坑啦~🥳
余下这部分内容可能还有点多,今天还有好几节课,可能看不完这么多内容,就尽量多看一点吧~👩💻
HTML表单 forms
1)表单介绍
-
HTML
<form>元素定义了一种用于收集用户输入的表单:<form> . form elements . </form> -
HTML表单包含表单元素。表单元素是不同类型的输入元素,例如:文本字段、复选框、单选按钮、提交按钮等。
-
<input>元素是最重要的表单元素,<input>根据type属性,该元素以几种方式显示。类型 描述 <input type =“ text”> 定义单行文本输入字段 <input type =“ radio”> 定义一个单选按钮(用于选择多个选项之一) <input type =“ submit”> 定义一个提交按钮(用于提交表单) -
<input type =“text">定义用于文本输入的单行输入字段:<form> <label for="fname">First name:</label><br> <input type="text" id="fname" name="fname"><br> <label for="lname">Last name:</label><br> <input type="text" id="lname" name="lname"> </form>注意📌:表单本身不可见。另请注意,输入字段的默认宽度为20个字符。
-
<label>标记定义为许多形式的元素的标签,该<label>元素对屏幕阅读器用户很有用,因为当用户将注意力集中在输入元素上时,屏幕阅读器将读出加载标签。该<label>元素还可以帮助难以单击很小区域(例如单选按钮或复选框)的用户,因为当用户单击<label>元素内的文本时,它将切换单选按钮/复选框。 -
<input type="radio">定义一个单选按钮,单选按钮使用户可以选择有限数量的选项之一。<form> <input type="radio" id="male" name="gender" value="male"> <label for="male">Male</label><br> <input type="radio" id="female" name="gender" value="female"> <label for="female">Female</label><br> <input type="radio" id="other" name="gender" value="other"> <label for="other">Other</label> </form>以上代码在浏览器显示方式:
-
<input type="submit">定义一个按钮,用于 将表单数据提交给表单处理程序。表单处理程序通常是服务器上的页面且带有用于处理输入数据的脚本。表单处理程序在表单的action 属性中指定。<form action="/action_page.php"> <label for="fname">First name:</label><br> <input type="text" id="fname" name="fname" value="John"><br> <label for="lname">Last name:</label><br> <input type="text" id="lname" name="lname" value="Doe"><br><br> <input type="submit" value="Submit"> </form> -
action属性定义提交表单时要执行的操作。通常,当用户单击“提交”按钮时,表单数据将发送到服务器上的页面。在上面的示例中,表单数据被发送到服务器上名为“/action_page.php”的页面。此页面包含用于处理表单数据的服务器端脚本:<form action="/action_page.php">如果忽略
action属性,则将操作设置为当前页面。 -
target属性指定提交的结果在新的浏览器选项卡中、框架中还是在当前窗口中打开。默认值为
_self,表示表单将在当前窗口中提交,如果想要在新的浏览器选项卡中打开表单结果,使用值_blank。还有其他的,在上一个笔记中记录啦~✍🏻 -
method属性指定提交表单数据时要使用的HTTP方法(GET或 POST)<form action="/action_page.php" method="get"> <form action="/action_page.php" method="post">-
提交表单数据时,默认的HTTP方法是GET。但是,使用GET时,表单数据将在页面的地址字段中可见:
/action_page.php?firstname=John&lastname=Doe- 以名称/值对的形式将表单数据附加到URL中
- URL的长度受到限制(2048个字符)
- 切勿使用GET发送敏感数据!(因为将在URL中显示)
- 对于用户希望将结果添加为书签的表单提交很有用
- GET更适合非安全数据,例如Google中的查询字符串
-
如果表单数据包含敏感信息或个人信息,请始终使用POST。POST方法不会在页面地址字段中显示表单数据。
- POST没有大小限制,可用于发送大量数据。
- 带有POST的表单提交无法添加书签
-
-
每个输入字段必须具有
name要提交的属性,如果省略name属性,则不发送该输入字段的数据。 -
所有表单属性清单🧾:
Attribute Description accept-charset Specifies the charset used in the submitted form (default: the page charset). action Specifies an address (url) where to submit the form (default: the submitting page). autocomplete Specifies if the browser should autocomplete the form (default: on). enctype Specifies the encoding of the submitted data (default: is url-encoded). method Specifies the HTTP method used when submitting the form (default: GET). name Specifies a name used to identify the form (for DOM usage: document.forms.name). novalidate Specifies that the browser should not validate the form. target Specifies the target of the address in the action attribute (default: _self).
2)HTML表单元素
-
<input>元素根据type属性显示不同方面,如果type属性被忽略,则输入字段将使用默认类型:text -
<select>元素定义了一个下拉列表:<select id="cars" name="cars"> <option value="volvo">Volvo</option> <option value="saab">Saab</option> <option value="fiat">Fiat</option> <option value="audi">Audi</option> </select><option>元素定义了可以被选择的选项,默认情况下,下拉列表中的第一项处于选中状态,如果要定义预选选项,请将selected属性添加到选项中:<option value="fiat" selected>Fiat</option>使用
size属性指定可见值的数量:<select name="cars" size="3"> <option value="volvo">Volvo</option> <option value="saab">Saab</option> <option value="fiat">Fiat</option> <option value="audi">Audi</option> </select>使用
multiple属性允许用户选择多个值:<select name="cars" size="4" multiple> <option value="volvo">Volvo</option> <option value="saab">Saab</option> <option value="fiat">Fiat</option> <option value="audi">Audi</option> </select> -
<textarea>元素限定了多行输入字段(文本区域):<textarea name="message" rows="10" cols="30"> The cat was playing in the garden. </textarea>rows属性指定文本区域中可见的行数cols属性指定文本区域的可见宽度上述HTML代码在浏览器中的显示方式:
还可以用CSS定义文本区域大小:
<textarea name="message" style="width:200px; height:600px;"> The cat was playing in the garden. </textarea> -
<button>元素定义了一个可点击的按钮,如:<button type="button" onclick="alert('Hello World!')">Click Me!</button>这是上面的HTML代码在浏览器中的显示方式:
注意:始终用type属性指定按钮元素,不同的浏览器可能对按钮元素使用不同的默认类型。
-
<fieldset>元素用于将表单中的相关数据分组,<legend>元素定义<fieldset>元素的标题。<form action="/action_page.php"> <fieldset> <legend>Personalia:</legend> <label for="fname">First name:</label><br> <input type="text" id="fname" name="fname" value="John"><br> <label for="lname">Last name:</label><br> <input type="text" id="lname" name="lname" value="Doe"><br><br> <input type="submit" value="Submit"> </fieldset> </form>上面的HTML代码在浏览器中显示:
-
<datalist>元素为一个<input>元素提供预先定义的选项列表。用户在输入数据时将可以看到预定义选项的下拉列表。<input>元素的list属性必须参考<datalist>的id属性。<form action="/action_page.php"> <input list="browsers"> <datalist id="browsers"> <option value="Internet Explorer"> <option value="Firefox"> <option value="Chrome"> <option value="Opera"> <option value="Safari"> </datalist> </form> -
<output>元素表示一个计算的结果(由一个脚本执行),执行计算并在<output>元素中显示结果:<form action="/action_page.php" oninput="x.value=parseInt(a.value)+parseInt(b.value)"> 0 <input type="range" id="a" name="a" value="50"> 100 + <input type="number" id="b" name="b" value="50"> = <output name="x" for="a b"></output> <br><br> <input type="submit"> </form> -
HTML表单元素汇总:
Tag Description <form>Defines an HTML form for user input <input>Defines an input control <textarea>Defines a multiline input control (text area) <label>Defines a label for an <input>element<fieldset>Groups related elements in a form <legend>Defines a caption for a <fieldset>element<select>Defines a drop-down list <optgroup>Defines a group of related options in a drop-down list <option>Defines an option in a drop-down list <button>Defines a clickable button <datalist>Specifies a list of pre-defined options for input controls <output>Defines the result of a calculation
3)HTML input类型
-
input文字:
<input type="text">定义单行文本输入字段:<form> <label for="fname">First name:</label><br> <input type="text" id="fname" name="fname"><br> <label for="lname">Last name:</label><br> <input type="text" id="lname" name="lname"> </form> -
input密码:
<input type="password">定义一个密码字段:<form> <label for="username">Username:</label><br> <input type="text" id="username" name="username"><br> <label for="pwd">Password:</label><br> <input type="password" id="pwd" name="pwd"> </form>密码字段中的字符被屏蔽(显示为星号或圆圈)
-
input提交:
<input type="submit">定义一个按钮,用于将表单数据提交给表单处理程序<form action="/action_page.php"> <label for="fname">First name:</label><br> <input type="text" id="fname" name="fname" value="John"><br> <label for="lname">Last name:</label><br> <input type="text" id="lname" name="lname" value="Doe"><br><br> <input type="submit"> </form> -
input复位:
<input type="reset">定义一个重置按钮,该按钮会将所有表单值重置为其默认值<form action="/action_page.php"> <label for="fname">First name:</label><br> <input type="text" id="fname" name="fname" value="John"><br> <label for="lname">Last name:</label><br> <input type="text" id="lname" name="lname" value="Doe"><br><br> <input type="submit" value="Submit"> <input type="reset"> </form> -
input radio:
<input type="radio">定义一个单选按钮,单选按钮使用户只能选择有限数量的选项之一<form> <input type="radio" id="male" name="gender" value="male"> <label for="male">Male</label><br> <input type="radio" id="female" name="gender" value="female"> <label for="female">Female</label><br> <input type="radio" id="other" name="gender" value="other"> <label for="other">Other</label> </form> -
input 复选框:
<input type="checkbox">定义一个复选框,复选框允许用户在数量有限的选项中选择0个或更多的选项。<form> <input type="checkbox" id="vehicle1" name="vehicle1" value="Bike"> <label for="vehicle1"> I have a bike</label><br> <input type="checkbox" id="vehicle2" name="vehicle2" value="Car"> <label for="vehicle2"> I have a car</label><br> <input type="checkbox" id="vehicle3" name="vehicle3" value="Boat"> <label for="vehicle3"> I have a boat</label> </form> -
input 按钮:
<input type="button">定义一个按钮<input type="button" onclick="alert('Hello World!')" value="Click Me!"> -
input 颜色:
<input type="color">被用于有颜色的输入字段。根据浏览器的支持,颜色选择器可以显示在输入字段中。<form> <label for="favcolor">Select your favorite color:</label> <input type="color" id="favcolor" name="favcolor"> </form> -
input 日期:
<input type="date">被用于应该包含日期输入字段。根据浏览器的支持,日期选择器可以显示在输入字段中。<form> <label for="birthday">Birthday:</label> <input type="date" id="birthday" name="birthday"> </form>还可以使用
min和max属性作为日期添加限制:<form> <label for="datemax">Enter a date before 1980-01-01:</label> <input type="date" id="datemax" name="datemax" max="1979-12-31"><br><br> <label for="datemin">Enter a date after 2000-01-01:</label> <input type="date" id="datemin" name="datemin" min="2000-01-02"> </form> -
input Datetime-local:
<input type="datetime=local">指定日期和时间输入栏,没有时区。根据浏览器的支持,日期选择器可以显示在输入字段中。<form> <label for="birthdaytime">Birthday (date and time):</label> <input type="datetime-local" id="birthdaytime" name="birthdaytime"> </form> -
input电子邮件:
<input type="email">被用于需要包含E-mail地址的输入地址。根据浏览器的支持,电子邮件地址在提交时可以自动进行验证。一些智能手机可以识别电子邮件类型,并在键盘上添加“.com”以匹配电子邮件输入。<form> <label for="email">Enter your email:</label> <input type="email" id="email" name="email"> </form> -
input文件:
<input type="file">定义一个文件选择字段和一个浏览按钮。<form> <label for="myfile">Select a file:</label> <input type="file" id="myfile" name="myfile"> </form> -
input月份:
<input type="month">允许用户选择年份和月份。根据浏览器支持,日期选择器可以显示在输入字段中。<form> <label for="bdaymonth">Birthday (month and year):</label> <input type="month" id="bdaymonth" name="bdaymonth"> </form> -
input 数字:
<input type="number">定义了一个数字输入字段,还可以设置接受数字的限制。以下显示了一个数字输入字段,用户可以在其中输入1到5之间的值。
<form> <label for="quantity">Quantity (between 1 and 5):</label> <input type="number" id="quantity" name="quantity" min="1" max="5"> </form> -
input 限制:
Attribute Description checked Specifies that an input field should be pre-selected when the page loads (for type=”checkbox” or type=”radio”) disabled Specifies that an input field should be disabled max Specifies the maximum value for an input field maxlength Specifies the maximum number of character for an input field min Specifies the minimum value for an input field pattern Specifies a regular expression to check the input value against readonly Specifies that an input field is read only (cannot be changed) required Specifies that an input field is required (must be filled out) size Specifies the width (in characters) of an input field step Specifies the legal number intervals for an input field value Specifies the default value for an input field 以下示例显示一个数字输入字段,可以在其中输入从0到100的值,以10为步长。默认值为30。
<form> <label for="quantity">Quantity:</label> <input type="number" id="quantity" name="quantity" min="0" max="100" step="10" value="30"> </form> -
input范围:
<input type="range">定义一个范围控制对于不需要输入特别精确的数字。<form> <label for="vol">Volume (between 0 and 50):</label> <input type="range" id="vol" name="vol" min="0" max="50"> </form> -
input 搜索:
<input type="search">用于搜索字段(搜索字段的像一个普通的文本字段)<form> <label for="gsearch">Search Google:</label> <input type="search" id="gsearch" name="gsearch"> </form> -
input 电话:
<input type="tel">被用于应该包含电话号码的输入字段。<form> <label for="phone">Enter your phone number:</label> <input type="tel" id="phone" name="phone" placeholder="123-45-678" pattern="[0-9]{3}-[0-9]{2}-[0-9]{3}"> </form> -
input 时间:
<input type="time">允许用户选择时间(无时区),根据浏览器支持,时间选择器可以显示在输入字段中。<form> <label for="appt">Select a time:</label> <input type="time" id="appt" name="appt"> </form> -
input 网址:
<input type="url">被用于需要包含URL地址的输入字段,根据浏览器的支持,提交时可以自动验证URL字段。一些智能手机可以识别网址类型,并在键盘上添加.com以匹配网址输入。<form> <label for="homepage">Add your homepage:</label> <input type="url" id="homepage" name="homepage"> </form> -
input 周:
<input type="week">允许用户选择某年的某个星期。根据浏览器支持,日期选择器可以显示在输入字段中。<form> <label for="week">Select a week:</label> <input type="week" id="week" name="week"> </form>
3)HTML input属性
-
值属性:
value属性为输入字段指定一个初始值<form> <label for="fname">First name:</label><br> <input type="text" id="fname" name="fname" value="John"><br> <label for="lname">Last name:</label><br> <input type="text" id="lname" name="lname" value="Doe"> </form> -
只读属性:
readonly属性指定输入字段为只读,只读输入字段无法修改(但是用户可以点击它突出显示并从中复制文本)。提交表单时,将发送一个只读输入字段的值。<form> <label for="fname">First name:</label><br> <input type="text" id="fname" name="fname" value="John" readonly><br> <label for="lname">Last name:</label><br> <input type="text" id="lname" name="lname" value="Doe"> </form> -
禁用属性:
disabled属性指定应禁用输入字段。禁用的输入字段不可用且不可点击,提交表单时,不会发送禁用输入字段的值。<form> <label for="fname">First name:</label><br> <input type="text" id="fname" name="fname" value="John" disabled><br> <label for="lname">Last name:</label><br> <input type="text" id="lname" name="lname" value="Doe"> </form> -
大小属性:
size属性指定输入字段的可见宽度(以字符为单位),默认值为20。注意⚠️:
size属性适用于以下输入类型:文本、搜索、电话、URL、电子邮件和密码。<form> <label for="fname">First name:</label><br> <input type="text" id="fname" name="fname" size="50"><br> <label for="pin">PIN:</label><br> <input type="text" id="pin" name="pin" size="4"> </form> -
maxlength属性:
maxlength属性指定输入字段中允许的最大字符数。⚠️:当设置maxlength时,输入字段将不接受超过指定的字符数。但是,此属性不提供任何反馈,如果要警告用户,必须编写JavaScript代码。<form> <label for="fname">First name:</label><br> <input type="text" id="fname" name="fname" size="50"><br> <label for="pin">PIN:</label><br> <input type="text" id="pin" name="pin" maxlength="4" size="4"> </form> -
最小最大属性:
min和max属性指定输入字段的最小值和最大值。min和max可以用于以下输入类型属性:数量,范围,时间,日期时间,地方,月,时间和星期。提示📌:一起使用max和min属性可以创建一系列合法值。
<form> <label for="datemax">Enter a date before 1980-01-01:</label> <input type="date" id="datemax" name="datemax" max="1979-12-31"><br><br> <label for="datemin">Enter a date after 2000-01-01:</label> <input type="date" id="datemin" name="datemin" min="2000-01-02"><br><br> <label for="quantity">Quantity (between 1 and 5):</label> <input type="number" id="quantity" name="quantity" min="1" max="5"> </form> -
多重属性:
multiple属性指定允许用户在输入字段中输入多个值,multiple属性适用于以下输入类型:电子邮件和文件。<form> <label for="files">Select files:</label> <input type="file" id="files" name="files" multiple> </form> -
模式属性:
pattern属性指定一个正则表达式,提交表单时,将根据该正则表达式检查输入字段的值。pattern属性适用于以下输入类型:文本,日期,搜索,URL,电话,电子邮件和密码。提示📌:使用全局标题属性来描述模式以帮助用户。👇输入字段只能包含三个字母(不能包含数字或特殊字符)
<form> <label for="country_code">Country code:</label> <input type="text" id="country_code" name="country_code" pattern="[A-Za-z]{3}" title="Three letter country code"> </form> -
占位符属性:
placeholder属性指定简短的提示,该提示描述输入字段的期望值(样本值或期望格式的简短描述)。在用户输入值之前,简短提示会显示在输入字段中。placeholder属性适用于以下输入类型:文本,搜索,URL,电话,电子邮件和密码。<form> <label for="phone">Enter a phone number:</label> <input type="tel" id="phone" name="phone" placeholder="123-4567-8901" pattern="[0-9]{3}-[0-9]{2}-[0-9]{3}"> </form> -
必需属性:
required属性指定在提交表单之前必须填写输入字段。required属性适用于以下输入类型:文本,搜索,URL,电话,电子邮件,密码,日期选择器,数字,复选框,单选和文件。<form> <label for="username">Username:</label> <input type="text" id="username" name="username" required> </form> -
步长属性:
step属性指定输入字段的合法编号间隔。例如:如果step =“ 3”,则合法数字可以是-3、0、3、6等。提示📌:此属性可以与max和min属性一起使用,以创建一系列合法值。该step属性适用于以下输入类型:数字,范围,日期,本地日期时间,月份,时间和星期。<form> <label for="points">Points:</label> <input type="number" id="points" name="points" step="3"> </form> -
自动对焦属性:
autofocus属性指定页面加载时输入字段应自动获得焦点。<form> <label for="fname">First name:</label><br> <input type="text" id="fname" name="fname" autofocus><br> <label for="lname">Last name:</label><br> <input type="text" id="lname" name="lname"> </form> -
高度和宽度属性:输入
height和width属性指定<input type="image">元素的高度和宽度。提示📌:始终同时指定图像的高度和宽度属性,如果设置了高度和宽度,则在加载页面时保留图像所需的空间。没有这些属性,浏览器将不知道图像的大小,也无法为其保留适当的空间。效果是页面布局将在加载过程中(图像加载时)改变。<form> <label for="fname">First name:</label> <input type="text" id="fname" name="fname"><br><br> <label for="lname">Last name:</label> <input type="text" id="lname" name="lname"><br><br> <input type="image" src="img_submit.gif" alt="Submit" width="48" height="48"> </form> -
列表属性:
list属性是为<input>元素指定<datalist>元素,<datalist>提供了预先定义的选项。<form> <input list="browsers"> <datalist id="browsers"> <option value="Internet Explorer"> <option value="Firefox"> <option value="Chrome"> <option value="Opera"> <option value="Safari"> </datalist> </form> -
自动补充属性:输入
autocomplete属性指定表单或输入字段应启用还是禁用自动补充功能。自动补充功能使浏览器可以预测值。当用户开始输入字段时,浏览器应根据较早键入的值显示用于填写字段的选项。该autocomplete属性适用<form>于以下<input>类型:文本,搜索,URL,电话,电子邮件,密码,日期选择器,范围和颜色。<form action="/action_page.php" autocomplete="on"> <label for="fname">First name:</label> <input type="text" id="fname" name="fname"><br><br> <label for="lname">Last name:</label> <input type="text" id="lname" name="lname"><br><br> <label for="email">Email:</label> <input type="email" id="email" name="email" autocomplete="off"><br><br> <input type="submit" value="Submit"> </form>提示📌:在某些浏览器中,可能需要激活自动完成功能才能起作用(在浏览器菜单的“首选项”下查找)。
4)HTML输入表单属性
-
表单属性:input
form属性定义了<input>元素属于的表单 -
input的
form属性的值必须等于<form>的id属性。<form action="/action_page.php" id="form1"> <label for="fname">First name:</label> <input type="text" id="fname" name="fname"><br><br> <input type="submit" value="Submit"> </form> <label for="lname">Last name:</label> <input type="text" id="lname" name="lname" form="form1"> -
formaction属性指定提交表单时将处理输入的文件的URL。注意📌:此属性将覆盖
form的action属性。该formaction属性适用于以下输入类型:提交和图像。<form action="/action_page.php"> <label for="fname">First name:</label> <input type="text" id="fname" name="fname"><br><br> <label for="lname">Last name:</label> <input type="text" id="lname" name="lname"><br><br> <input type="submit" value="Submit"> <input type="submit" formaction="/action_page2.php" value="Submit as Admin"> </form> -
formenctype属性指定提交时应如何编码表单数据(仅适用于具有method =“ post”的表单)。注意📌:此属性将覆盖
<form>元素的enctype属性。以下是具有两个提交按钮的表单。第一个发送使用默认编码的表单数据,第二个发送编码为“ multipart / form-data”的表单数据:
<form action="/action_page_binary.asp" method="post"> <label for="fname">First name:</label> <input type="text" id="fname" name="fname"><br><br> <input type="submit" value="Submit"> <input type="submit" formenctype="multipart/form-data" value="Submit as Multipart/form-data"> </form> -
input的
formmethod属性定义用于将表单数据发送到操作URL的HTTP方法。注意📌:此属性将覆盖<form>元素的method属性。该formmethod属性适用于以下输入类型:提交和图像。表单数据可以作为URL变量(method =“ get”)或作为HTTP post事务(method =“ post”)发送。以下是具有两个提交按钮的表单。第一个使用method =“ get”发送表单数据。第二个使用method =“ post”发送表单数据:
<form action="/action_page.php" method="get"> <label for="fname">First name:</label> <input type="text" id="fname" name="fname"><br><br> <label for="lname">Last name:</label> <input type="text" id="lname" name="lname"><br><br> <input type="submit" value="Submit using GET"> <input type="submit" formmethod="post" value="Submit using POST"> </form> -
input
formtarget的属性指定名称或关键字,该名称或关键字指示在提交表单后在何处显示收到的响应。注意📌:此属性将覆盖<form>元素的目标属性。该formtarget属性适用于以下输入类型:提交和图像。以下具有两个提交按钮且具有不同目标窗口的表单:
<form action="/action_page.php"> <label for="fname">First name:</label> <input type="text" id="fname" name="fname"><br><br> <label for="lname">Last name:</label> <input type="text" id="lname" name="lname"><br><br> <input type="submit" value="Submit"> <input type="submit" formtarget="_blank" value="Submit to a new window/tab"> </form> -
input
formnovalidate属性指定提交时不应验证<input>元素。注意📌:此属性将覆盖<form>元素的novalidate属性。该formnovalidate属性仅适用于以下输入类型:提交。以下是具有两个提交按钮的AA表单(带有和不带有验证):
<form action="/action_page.php"> <label for="email">Enter your email:</label> <input type="email" id="email" name="email"><br><br> <input type="submit" value="Submit"> <input type="submit" formnovalidate="formnovalidate" value="Submit without validation"> </form> -
novalidate是<form>的一个属性,novalidate指定在提交时不应验证所有表单数据。<form action="/action_page.php" novalidate> <label for="email">Enter your email:</label> <input type="email" id="email" name="email"><br><br> <input type="submit" value="Submit"> </form>
HTML 图形
1)HTML画布
-
HTML
canvas元素用于在网页上绘制图形,以下的图形使用了canvas,它显示了四个元素:红色矩阵、渐变矩阵、多色矩阵、多色文本。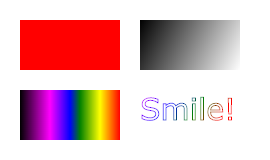
-
HTML
<canvas>元素用于通过JavaScript绘制图形。<canvas>元素只是用于图形的容器,你必须使用JavaScript画图。Canvas有几种关于绘制路径、框、圆圈、文本和添加图像的方法。
-
下表中的数字定义了满足
<canvas>元素的第一个浏览器版本:
-
画布是HTML页面上的矩形区域,默认情况下,画布没有边框且没有内容。
<canvas id="myCanvas" width="200" height="100"></canvas>注意📌:始终指定一个
id属性(将在脚本中引用),并指定width和height属性以定义画布的大小。要添加边框,请使用style属性。这是一个基本的空白画布的示例:
-
画一条线:
<canvas id="myCanvas" width="200" height="100" style="border:1px solid #d3d3d3;"> Your browser does not support the HTML5 canvas tag.</canvas> <script> var c = document.getElementById("myCanvas"); var ctx = c.getContext("2d"); ctx.moveTo(0,0); ctx.lineTo(200,100); ctx.stroke(); </script> -
画一个圆:
<canvas id="myCanvas" width="200" height="100" style="border:1px solid #d3d3d3;"> Your browser does not support the HTML5 canvas tag.</canvas> <script> var c = document.getElementById("myCanvas"); var ctx = c.getContext("2d"); ctx.beginPath(); ctx.arc(95,50,40,0,2*Math.PI); ctx.stroke(); </script> -
画文字:
<canvas id="myCanvas" width="200" height="100" style="border:1px solid #d3d3d3;"> Your browser does not support the HTML5 canvas tag.</canvas> <script> var c = document.getElementById("myCanvas"); var ctx = c.getContext("2d"); ctx.beginPath(); ctx.arc(95,50,40,0,2*Math.PI); ctx.stroke(); </script> -
描边文字:
<!DOCTYPE html> <html> <body> <canvas id="myCanvas" width="200" height="100" style="border:1px solid #d3d3d3;"> Your browser does not support the HTML5 canvas tag.</canvas> <script> var c = document.getElementById("myCanvas"); var ctx = c.getContext("2d"); ctx.font = "30px Arial"; ctx.strokeText("Hello World",10,50); </script> </body> </html> -
绘制线性渐变:
<canvas id="myCanvas" width="200" height="100" style="border:1px solid #d3d3d3;"> Your browser does not support the HTML5 canvas tag.</canvas> <script> var c = document.getElementById("myCanvas"); var ctx = c.getContext("2d"); // Create gradient var grd = ctx.createLinearGradient(0,0,200,0); grd.addColorStop(0,"red"); grd.addColorStop(1,"white"); // Fill with gradient ctx.fillStyle = grd; ctx.fillRect(10,10,150,80); </script> -
绘制圆形渐变:
<canvas id="myCanvas" width="200" height="100" style="border:1px solid #d3d3d3;"> Your browser does not support the HTML5 canvas tag.</canvas> <script> var c = document.getElementById("myCanvas"); var ctx = c.getContext("2d"); // Create gradient var grd = ctx.createRadialGradient(75,50,5,90,60,100); grd.addColorStop(0,"red"); grd.addColorStop(1,"white"); // Fill with gradient ctx.fillStyle = grd; ctx.fillRect(10,10,150,80); </script> -
画图:
var c = document.getElementById("myCanvas"); var ctx = c.getContext("2d"); var img = document.getElementById("scream"); ctx.drawImage(img, 10, 10); -
要了解有关HTML
<canvas>的所有信息,查看HTML Canvas教程。
2)SVG
-
SVG代表可缩放矢量图形,SVG用于定义Web图形,SVG是W3C的推荐。
-
HTML
<svg>是SVG图形的容器。SVG有几种绘制路径、框、文本和图形图像的方法。 -
以下表格中数字制定了完全支持
<svg>元素的第一个浏览器版本:
-
SVG圈:
<!DOCTYPE html> <html> <body> <svg width="100" height="100"> <circle cx="50" cy="50" r="40" stroke="green" stroke-width="4" fill="yellow" /> </svg> </body> </html> -
SVG矩形:
<svg width="400" height="100"> <rect width="400" height="100" style="fill:rgb(0,0,255);stroke-width:10;stroke:rgb(0,0,0)" /> </svg> -
SVG圆角矩阵:
<svg width="400" height="180"> <rect x="50" y="20" rx="20" ry="20" width="150" height="150" style="fill:red;stroke:black;stroke-width:5;opacity:0.5" /> </svg> -
SVG之星:
<svg width="300" height="200"> <polygon points="100,10 40,198 190,78 10,78 160,198" style="fill:lime;stroke:purple;stroke-width:5;fill-rule:evenodd;" /> </svg> -
SVG徽章:
<svg height="130" width="500"> <defs> <linearGradient id="grad1" x1="0%" y1="0%" x2="100%" y2="0%"> <stop offset="0%" style="stop-color:rgb(255,255,0);stop-opacity:1" /> <stop offset="100%" style="stop-color:rgb(255,0,0);stop-opacity:1" /> </linearGradient> </defs> <ellipse cx="100" cy="70" rx="85" ry="55" fill="url(#grad1)" /> <text fill="#ffffff" font-size="45" font-family="Verdana" x="50" y="86">SVG</text> Sorry, your browser does not support inline SVG. </svg> -
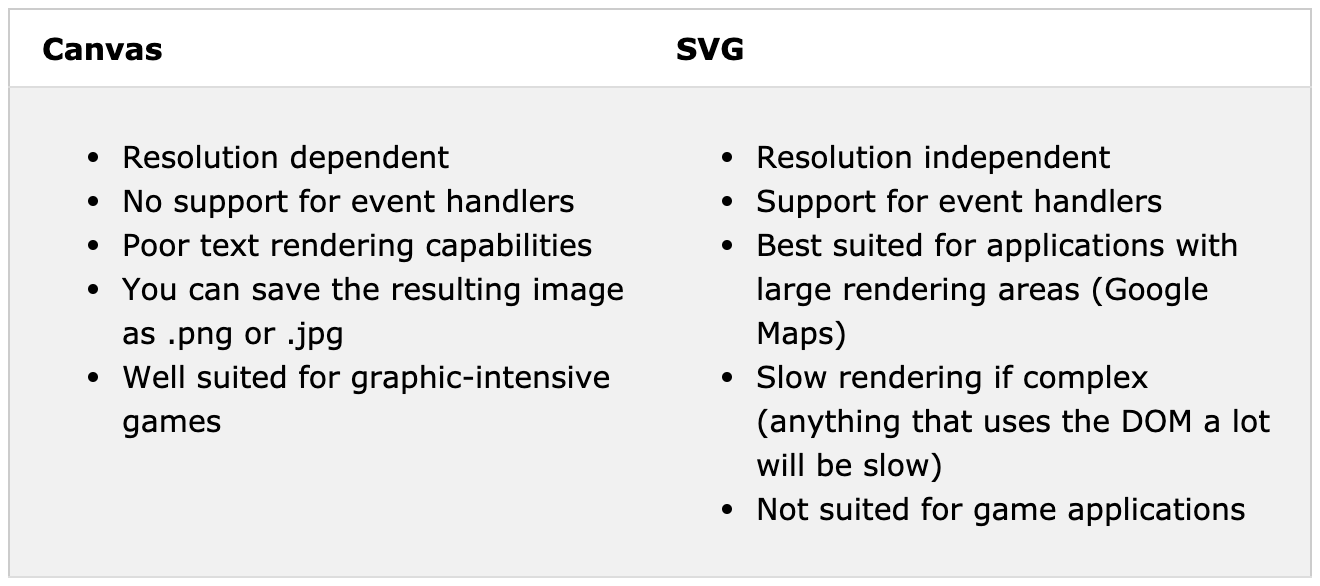
SVG和Canvas之间的差异:
- SVG是用于描述XML中的2D图形的语言。
- Canvas使用JavaScript动态绘制2D图形。
- SVG基于XML,这意味着每个元素在SVG DOM中都可用,可以为元素附加JavaScript事件处理程序。
- 在SVG中,每个绘制的形状都被记住为一个对象。如果更改了SVG对象的属性,则浏览器可以自动重新渲染形状。
- 画布逐像素渲染。在画布中,一旦绘制了图形,浏览器就会将其忘记。如果应更改其位置,则需要重新绘制整个场景,包括图形可能覆盖的所有对象。
-
SVG和canvas比较:
-
要了解有关SVG的更多信息,请阅读SVG教程。
HTML媒体
1)HTML多媒体
- 网络上的多媒体是声音,音乐,视频,电影和动画。
- 多媒体有许多不同的格式,它可以几乎是你可以听到或看到的任何东西。示例:图像,音乐,声音,视频,唱片,电影,动画等。网页通常包含不同类型和格式的多媒体元素。
- 最初的网络浏览器仅支持文本,仅限于单一颜色的单一字体。后来出现了支持颜色,字体和图像的浏览器!主流浏览器对音频,视频和动画的处理方式也有所不同。支持不同的格式,某些格式需要额外的帮助程序(插件)才能工作。HTML5多媒体有望为多媒体带来更轻松的未来。
-
多媒体元素(如音频或视频)存储在媒体文件中。发现文件类型的最常见方法是查看文件扩展名。多媒体文件具有格式和不同的扩展名,例如:.swf,.wav,.mp3,.mp4,.mpg,.wmv和.avi。
-
常见的视频格式:MP4是互联网视频的新的和即将推出的格式;YouTube推荐MP4;
MP4受Flash Player支持;HTML5支持MP4。
Format File Description MPEG .mpg .mpeg MPEG. Developed by the Moving Pictures Expert Group. The first popular video format on the web. Used to be supported by all browsers, but it is not supported in HTML5 (See MP4). AVI .avi AVI (Audio Video Interleave). Developed by Microsoft. Commonly used in video cameras and TV hardware. Plays well on Windows computers, but not in web browsers. WMV .wmv WMV (Windows Media Video). Developed by Microsoft. Commonly used in video cameras and TV hardware. Plays well on Windows computers, but not in web browsers. QuickTime .mov QuickTime. Developed by Apple. Commonly used in video cameras and TV hardware. Plays well on Apple computers, but not in web browsers. (See MP4) RealVideo .rm .ram RealVideo. Developed by Real Media to allow video streaming with low bandwidths. It is still used for online video and Internet TV, but does not play in web browsers. Flash .swf .flv Flash. Developed by Macromedia. Often requires an extra component (plug-in) to play in web browsers. Ogg .ogg Theora Ogg. Developed by the Xiph.Org Foundation. Supported by HTML5. WebM .webm WebM. Developed by the web giants, Mozilla, Opera, Adobe, and Google. Supported by HTML5. MPEG-4 or MP4 .mp4 MP4. Developed by the Moving Pictures Expert Group. Based on QuickTime. Commonly used in newer video cameras and TV hardware. Supported by all HTML5 browsers. Recommended by YouTube. 注意⚠️:HTML5标准仅支持MP4,WebM和Ogg视频。
-
音频格式:MP3是压缩记录音乐的最新格式,术语MP3已成为数字音乐的同义词。如果您的网站是关于录制音乐的,则选择MP3。
Format File Description MIDI .mid .midi MIDI (Musical Instrument Digital Interface). Main format for all electronic music devices like synthesizers and PC sound cards. MIDI files do not contain sound, but digital notes that can be played by electronics. Plays well on all computers and music hardware, but not in web browsers. RealAudio .rm .ram RealAudio. Developed by Real Media to allow streaming of audio with low bandwidths. Does not play in web browsers. WMA .wma WMA (Windows Media Audio). Developed by Microsoft. Commonly used in music players. Plays well on Windows computers, but not in web browsers. AAC .aac AAC (Advanced Audio Coding). Developed by Apple as the default format for iTunes. Plays well on Apple computers, but not in web browsers. WAV .wav WAV. Developed by IBM and Microsoft. Plays well on Windows, Macintosh, and Linux operating systems. Supported by HTML5. Ogg .ogg Ogg. Developed by the Xiph.Org Foundation. Supported by HTML5. MP3 .mp3 MP3 files are actually the sound part of MPEG files. MP3 is the most popular format for music players. Combines good compression (small files) with high quality. Supported by all browsers. MP4 .mp4 MP4 is a video format, but can also be used for audio. MP4 video is the upcoming video format on the internet. This leads to automatic support for MP4 audio by all browsers. 注意⚠️:HTML5标准仅支持MP3、WAV和Ogg音频。
2)HTML5视频
-
HTML视频示例:
Video courtesy of Big Buck Bunny.
<video width="400" controls> <source src="mov_bbb.mp4" type="video/mp4"> <source src="mov_bbb.ogg" type="video/ogg"> Your browser does not support HTML5 video. </video> <p> Video courtesy of <a href="https://www.bigbuckbunny.org/" target="_blank">Big Buck Bunny</a>. </p> -
在HTML5之前,视频只能在带有插件(如Flash)的浏览器播放。HTML的
<video>元素指定了一种将视频嵌入网页中的标准方法。 -
浏览器支持:

-
要显示HTML视频,请使用
<video>元素:<video width="320" height="240" controls> <source src="movie.mp4" type="video/mp4"> <source src="movie.ogg" type="video/ogg"> Your browser does not support the video tag. </video> -
controls属性用于添加视频控件,例如播放,暂停和音量。 -
始终设置
width和height属性是好的。如果未设置高度和宽度,则在加载视频时页面可能会闪烁。 -
该
<source>元素允许您指定浏览器可以选择的替代视频文件。浏览器将使用第一个可识别的格式。 -
要自动开始播放视频,请使用
autoplay属性<video width="320" height="240" autoplay> <source src="movie.mp4" type="video/mp4"> <source src="movie.ogg" type="video/ogg"> Your browser does not support the video tag. </video>注意⚠️:autoplay属性在iPad和iPhone等移动设备上不起作用。
-
在HTML中,支持三种视频格式:MP4、WebM和Ogg
Browser MP4 WebM Ogg Internet Explorer YES NO NO Chrome YES YES YES Firefox YES YES YES Safari YES NO NO Opera YES (from Opera 25) YES YES -
文件格式对应的媒体类型:
File Format Media Type MP4 video/mp4 WebM video/webm Ogg video/ogg -
HTML5为
<video>元素定义DOM方法,属性和事件。这使您可以加载,播放和暂停视频,以及设置时长和音量。还有DOM事件可以在视频开始播放,暂停等时通知您。<!DOCTYPE html> <html> <body> <div style="text-align:center"> <button onclick="playPause()">Play/Pause</button> <button onclick="makeBig()">Big</button> <button onclick="makeSmall()">Small</button> <button onclick="makeNormal()">Normal</button> <br><br> <video id="video1" width="420"> <source src="mov_bbb.mp4" type="video/mp4"> <source src="mov_bbb.ogg" type="video/ogg"> Your browser does not support HTML5 video. </video> </div> <script> var myVideo = document.getElementById("video1"); function playPause() { if (myVideo.paused) myVideo.play(); else myVideo.pause(); } function makeBig() { myVideo.width = 560; } function makeSmall() { myVideo.width = 320; } function makeNormal() { myVideo.width = 420; } </script> <p>Video courtesy of <a href="https://www.bigbuckbunny.org/" target="_blank">Big Buck Bunny</a>.</p> </body> </html>
Video courtesy of Big Buck Bunny.
有关完整的DOM参考,请转到HTML5音频/视频DOM参考。
-
HTML5视频标签汇总:
Tag Description <video>Defines a video or movie <source>Defines multiple media resources for media elements, such as <video>and<audio><track>Defines text tracks in media players
3)HTML5音频
-
在HTML5之前,音频文件只能在带有插件如flash的浏览器中播放。HTML5的
<audio>元素指定了一种在网页中嵌入音频的标准方法。 -
浏览器支持:

-
要使用HTML播放音频文件,使用
<audio>元素:<audio controls> <source src="horse.ogg" type="audio/ogg"> <source src="horse.mp3" type="audio/mpeg"> Your browser does not support the audio element. </audio> -
controls属性添加音频控件,例如播放,暂停和音量。<source>元素允许您指定浏览器可以选择的替代音频文件,浏览器将使用第一个可识别的格式。<audio>和</audio>标签之间的文本仅在不支持<audio>元素的浏览器中显示。 -
在HTML5中,支持3种音频格式:MP3,WAV和OGG。
浏览器对不同格式的支持为:
Browser MP3 WAV OGG Edge/IE YES NO NO Chrome YES YES YES Firefox YES YES YES Safari YES YES NO Opera YES YES YES -
音频文件格式以及对应的媒体类型:
File Format Media Type MP3 audio/mpeg OGG audio/ogg WAV audio/wav -
HTML5为该
<audio>元素定义DOM方法,属性和事件。这使您可以加载,播放和暂停音频,以及设置持续时间和音量。还有DOM事件可以在音频开始播放,暂停等时通知您。有关完整的DOM参考,请转到HTML5音频/视频DOM参考。
4)HTML插件
-
插件的目的是扩展Web浏览器的功能。
-
助手应用程序(插件)是扩展Web浏览器标准功能的计算机程序。Java applet是著名插件的示例。可以使用
<object>标签或<embed>标签将插件添加到网页。 插件可用于多种用途:显示地图,扫描病毒,验证您的银行ID等。 -
显示视频和音频:使用
<video>和<audio>标签。 -
所有浏览器都支持
<object>元素,<object>元素定义HTML文档中的嵌入式对象。它用于在网页中嵌入插件(例如Java applet,PDF阅读器,Flash Player)。<object width="400" height="50" data="bookmark.swf"></object><object>元素还可以用于在HTML中包含HTML:<object width="100%" height="500px" data="snippet.html"></object>或图片:
<object data="audi.jpeg"></object> -
所有主流浏览器均支持
<embed>元素,<embed>元素还限定HTML文档中的嵌入式对象。Web浏览器长期以来一直支持<embed>元素。但是,它不是HTML5之前的HTML规范的一部分。注意⚠️:请注意,
<embed>元素没有结束标记,它不能包含替代文本。<embed>元素还可以用于在HTML中包含HTML:<embed width="100%" height="500px" src="snippet.html">或图片:
<embed src="audi.jpeg">
5)HTML YouTube视频
-
播放HTML格式视频的最简单方法是使用YouTube。
-
在本教程的前面,您已经看到您可能必须将视频转换为不同的格式才能在所有浏览器中播放。将视频转换为不同的格式可能既困难又耗时。一个更简单的解决方案是让YouTube播放您网页中的视频。
-
保存(或播放)视频时,YouTube会显示一个ID(例如tgbNymZ7vqY)。您可以使用此ID,并在HTML代码中引用您的视频。
-
要在网页上播放视频,请执行以下操作:
- 将视频上传到YouTube
- 记下视频ID
- 在网页中定义
<iframe>元素 - 让src属性指向视频网址
- 使用width和height属性指定播放器的尺寸
- 向网址添加其他任何参数(请参见下文)
<iframe width="420" height="315" src="https://www.youtube.com/embed/tgbNymZ7vqY"> </iframe> -
YouTube自动播放:通过在YouTube URL中添加一个简单的参数,用户访问该页面时自动开始播放视频。注意⚠️:在决定自动播放视频时,请仔细考虑。自动开始播放视频可能会使您的访客烦恼并最终造成弊大于利的后果。
值0(默认):播放器加载后,视频将不会自动播放。
值1:播放器加载时,视频将自动播放。
<iframe width="420" height="315" src="https://www.youtube.com/embed/tgbNymZ7vqY?autoplay=1"> </iframe> -
以逗号分隔的要播放视频列表(除了原始URL外)
-
YouTube循环:
值0(默认):视频仅播放一次。
值1:视频将循环播放(永远)。
<iframe width="420" height="315" src="https://www.youtube.com/embed/tgbNymZ7vqY?playlist=tgbNymZ7vqY&loop=1"> </iframe> -
YouTube控件:
值0:不显示播放器控件。
值1(默认):播放器控件显示。
<iframe width="420" height="315" src="https://www.youtube.com/embed/tgbNymZ7vqY?controls=0"> </iframe> -
❗️不建议使用
<object>或<embed>去插入YouTube视频,自2015年1月起已被弃用。
HTML API
1)HTML地理位置
-
HTML Geolocation API用于定位用户的位置。由于这会损害隐私,因此除非用户批准,否则该功能不可用。
注意📌:地理位置对于带有GPS的设备(例如智能手机)最为准确。
-
浏览器支持:
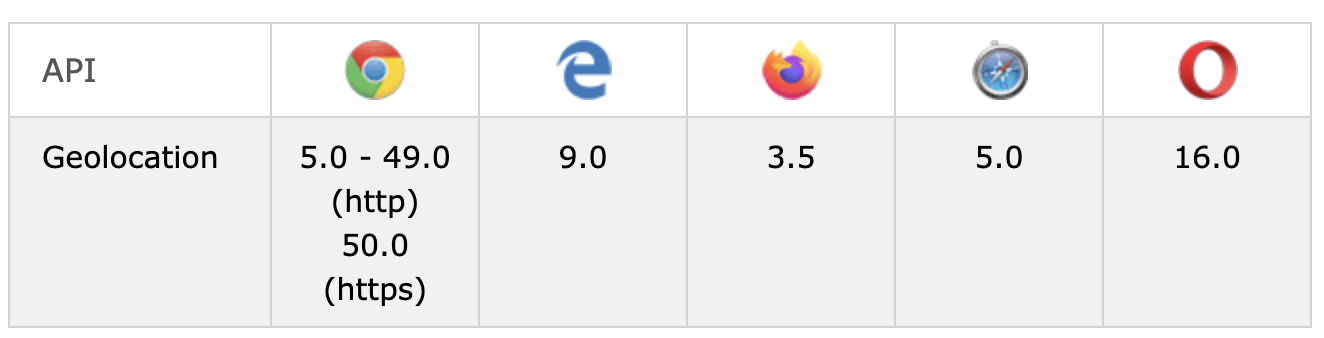
注意📌:从Chrome 50开始,Geolocation API仅适用于安全来源,例如HTTPS。如果您的站点托管在非安全来源(例如HTTP)上,则获取用户位置的请求将不再起作用。
-
getCurrentPosition()方法用于返回用户的位置,下面的示例返回用户位置的纬度和经度:<script> var x = document.getElementById("demo"); function getLocation() { if (navigator.geolocation) { navigator.geolocation.getCurrentPosition(showPosition); } else { x.innerHTML = "Geolocation is not supported by this browser."; } } function showPosition(position) { x.innerHTML = "Latitude: " + position.coords.latitude + "<br>Longitude: " + position.coords.longitude; } </script>Click the button to get your coordinates.
示例说明:
- 检查是否支持地理位置
- 如果支持,请运行getCurrentPosition()方法。如果没有,向用户显示一条消息
- 如果getCurrentPosition()方法成功,则它将坐标对象返回到参数(showPosition)中指定的函数
- showPosition()函数输出纬度和经度
上面的示例是一个非常基本的Geolocation脚本,没有错误处理。
-
getCurrentPosition()方法的第二个参数用于处理错误。它指定了在无法获取用户位置时要运行的功能:function getLocation() { if (navigator.geolocation) { navigator.geolocation.getCurrentPosition(showPosition, showError); } else { x.innerHTML = "Geolocation is not supported by this browser."; } } function showPosition(position) { x.innerHTML = "Latitude: " + position.coords.latitude + "<br>Longitude: " + position.coords.longitude; } function showError(error) { switch(error.code) { case error.PERMISSION_DENIED: x.innerHTML = "User denied the request for Geolocation." break; case error.POSITION_UNAVAILABLE: x.innerHTML = "Location information is unavailable." break; case error.TIMEOUT: x.innerHTML = "The request to get user location timed out." break; case error.UNKNOWN_ERROR: x.innerHTML = "An unknown error occurred." break; } } -
要在地图上显示结果,您需要访问地图服务,例如Google Maps。在下面的示例中,返回的纬度和经度用于在Google地图中显示位置(使用静态图片)
function showPosition(position) { var latlon = position.coords.latitude + "," + position.coords.longitude; var img_url = "https://maps.googleapis.com/maps/api/staticmap?center= "+latlon+"&zoom=14&size=400x300&sensor=false&key=YOUR_KEY"; document.getElementById("mapholder").innerHTML = "<img src='"+img_url+"'>"; } -
地理位置对于特定位置的信息也非常有用,例如:
- 最新的本地信息
- 在用户附近显示兴趣点
- 逐行导航(GPS)
-
getCurrentPosition()方法在成功时返回一个对象。始终返回纬度,经度和精度属性。如果可用,则返回其他属性:Property Returns coords.latitude The latitude as a decimal number (always returned) coords.longitude The longitude as a decimal number (always returned) coords.accuracy The accuracy of position (always returned) coords.altitude The altitude in meters above the mean sea level (returned if available) coords.altitudeAccuracy The altitude accuracy of position (returned if available) coords.heading The heading as degrees clockwise from North (returned if available) coords.speed The speed in meters per second (returned if available) timestamp The date/time of the response (returned if available) -
Geolocation对象还具有其他有趣的方法:
watchPosition()-返回用户的当前位置,并随着用户移动继续返回更新的位置(例如汽车中的GPS)。clearWatch()-停止watchPosition()方法。
下面的示例显示了该
watchPosition()方法。您需要一个准确的GPS设备来对此进行测试(例如智能手机):<script> var x = document.getElementById("demo"); function getLocation() { if (navigator.geolocation) { navigator.geolocation.watchPosition(showPosition); } else { x.innerHTML = "Geolocation is not supported by this browser."; } } function showPosition(position) { x.innerHTML = "Latitude: " + position.coords.latitude + "<br>Longitude: " + position.coords.longitude; } </script>
2)HTML5拖放
-
拖放是非常常见的功能。这是当您“抓取”对象并将其拖动到其他位置时。在HTML5中,拖放是标准的一部分:任何元素都是可拖动的。
-
浏览器支持:

-
拖放示例:
<!DOCTYPE HTML> <html> <head> <script> function allowDrop(ev) { ev.preventDefault(); } function drag(ev) { ev.dataTransfer.setData("text", ev.target.id); } function drop(ev) { ev.preventDefault(); var data = ev.dataTransfer.getData("text"); ev.target.appendChild(document.getElementById(data)); } </script> </head> <body> <div id="div1" ondrop="drop(event)" ondragover="allowDrop(event)"></div> <img id="drag1" src="img_logo.gif" draggable="true" ondragstart="drag(event)" width="336" height="69"> </body> </html> -
首先:要使元素可拖动,请将
draggable属性设置为true:<img draggable="true"> -
然后,指定拖动元素时应发生的情况。在上面的示例中,该
ondragstart属性调用一个函数drag(event),该函数指定要拖动的数据。该dataTransfer.setData()方法设置数据类型和拖动数据的值:function drag(ev) { ev.dataTransfer.setData("text", ev.target.id); }在这种情况下,数据类型为“文本”,其值为可拖动元素的ID(“ drag1”)。
-
ondragover事件指定可将拖动的数据放置到何处。默认情况下,不能将数据/元素放置到其他元素中。为了允许拖放,我们必须阻止对元素的默认处理。这是通过调用event.preventDefault()的方法来完成ondragover事件的:event.preventDefault() -
当拖放的数据被放置时,发生放置事件。在上面的示例中,ondrop属性调用一个函数drop(event):
function drop(ev) {
  ev.preventDefault();
  var data = ev.dataTransfer.getData("text");
  ev.target.appendChild(document.getElementById(data));
}
代码说明:
- 调用preventDefault()以防止浏览器对数据进行默认处理(默认打开为链接放置)
- 使用dataTransfer.getData()方法获取拖动的数据。此方法将返回在setData()方法中设置为相同类型的所有数据。
- 所拖动的数据是所拖动元素的ID(“ drag1”)
- 将拖动的元素追加到放置元素中
3)HTML5 网络存储
-
借助Web存储,Web应用程序可以在用户的浏览器中本地存储数据。在HTML5之前,应用程序数据必须存储在cookie中,并包含在每个服务器请求中。Web存储更加安全,并且可以在本地存储大量数据,而不会影响网站性能。
与cookie不同,存储限制更大(至少5MB),并且信息永远不会传输到服务器。
Web存储按来源(按域和协议)进行。所有页面,从一个来源出发,都可以存储和访问相同的数据。
-
浏览器支持:

-
HTML Web存储提供了两个用于在客户端上存储数据的对象:
window.localStorage:存储没有到期日期的数据window.sessionStorage:存储一个会话的数据(关闭浏览器选项卡时数据丢失)
在使用网络存储之前,请检查浏览器对localStorage和sessionStorage的支持:
if (typeof(Storage) !== "undefined") { // Code for localStorage/sessionStorage. } else { // Sorry! No Web Storage support.. } -
localStorage对象存储没有到期日期的数据。当浏览器关闭时,数据不会被删除,并且在第二天,第二周或第二年都可用。
// Store
localStorage.setItem("lastname", "Smith");

// Retrieve
document.getElementById("result").innerHTML = localStorage.getItem("lastname");
🌰说明:
- 使用name =“ lastname”和value =“ Smith”创建一个localStorage名称/值对
- 检索“姓氏”的值,并将其插入到具有id =“ result”的元素中
上面例子也可以这样写:
// Store
localStorage.lastname = "Smith";
// Retrieve
document.getElementById("result").innerHTML = localStorage.lastname;
删除“姓氏” localStorage项的语法如下:
localStorage.removeItem("lastname");注意📌:名称/值对始终存储为字符串。请记住在需要时将它们转换为另一种格式!
下面的示例计算用户单击按钮的次数。在此代码中,值字符串被转换为数字以能够增加计数器:
if (localStorage.clickcount) {
  localStorage.clickcount = Number(localStorage.clickcount) + 1;
} else {
  localStorage.clickcount = 1;
}
document.getElementById("result").innerHTML = "You have clicked the button " +
localStorage.clickcount + " time(s).";
Click the button to see the counter increase.
Close the browser tab (or window), and try again, and the counter will continue to count (is not reset).
-
该
sessionStorage对象与localStorage对象相同,只不过它仅存储一个会话的数据。当用户关闭特定的浏览器选项卡时,数据将被删除。下面的示例计算用户在当前会话中单击按钮的次数:
if (sessionStorage.clickcount) {
  sessionStorage.clickcount = Number(sessionStorage.clickcount) + 1;
} else {
  sessionStorage.clickcount = 1;
}
document.getElementById("result").innerHTML = "You have clicked the button " + sessionStorage.clickcount + " time(s) in this session.";
Click the button to see the counter increase.
Close the browser tab (or window), and try again, and the counter is reset.
4)HMTL5 Web Worker
-
在HTML页面中执行脚本时,直到脚本完成,页面才会变得无响应。
Web Worker是一种JavaScript,它在后台运行,独立于其他脚本,而不会影响页面性能。您可以继续做任何您想做的事情:单击,选择内容等而Web Worker在后台运行。
-
浏览器支持:

-
下面的示例创建一个简单的网络工作者,在后台对数字进行计数:
Count numbers:
Note: Internet Explorer 9 and earlier versions do not support Web Workers.
-
在创建Web Worker之前,请检查用户的浏览器是否支持它:
if (typeof(Worker) !== "undefined") { // Yes! Web worker support! // Some code..... } else { // Sorry! No Web Worker support.. } -
现在,让我们在外部JavaScript中创建Web Worker。在这里,我们创建一个重要的脚本,该脚本存储在“ demo_workers.js”文件中。
var i = 0;

function timedCount() {
  i = i + 1;
  postMessage(i);
  setTimeout("timedCount()",500);
}

timedCount();
上面代码的重要部分是
postMessage()方法:用于将消息发布回HTML页面。注意✍🏻:通常,Web Worker不用于此类简单脚本,而是用于CPU密集型任务。
-
现在我们有了Web worker文件,我们需要从HTML页面调用它。
以下几行检查工作程序是否已经存在,如果不存在,它会创建一个新的Web工作程序对象,并在“ demo_workers.js”中运行代码:
if (typeof(w) == "undefined") {
  w = new Worker("demo_workers.js");
}
然后,我们可以从网络工作者发送和接收消息。将“ onmessage”事件侦听器添加到Web Worker。
w.onmessage = function(event){
  document.getElementById("result").innerHTML = event.data;
};
当Web Worker发布消息时,将执行事件侦听器中的代码。来自Web Worker的数据存储在event.data中。
-
创建Web Worker对象后,它将继续侦听消息(即使在外部脚本完成之后),直到被终止。要终止网络工作者并释放浏览器/计算机资源,请使用以下
terminate()方法:w.terminate(); -
如果将worker变量设置为undefined,则在终止后,可以重用代码:
w = undefined; -
完整代码:
<!DOCTYPE html> <html> <body> <p>Count numbers: <output id="result"></output></p> <button onclick="startWorker()">Start Worker</button> <button onclick="stopWorker()">Stop Worker</button> <script> var w; function startWorker() { if (typeof(Worker) !== "undefined") { if (typeof(w) == "undefined") { w = new Worker("demo_workers.js"); } w.onmessage = function(event) { document.getElementById("result").innerHTML = event.data; }; } else { document.getElementById("result").innerHTML = "Sorry! No Web Worker support."; } } function stopWorker() { w.terminate(); w = undefined; } </script> </body> </html> -
由于Web Worker位于外部文件中,因此他们无权访问以下JavaScript对象:
- 窗口对象
- 文件对象
- 父对象
5)HTML 服务器发送的事件SSE
-
服务器发送事件SSE是网页自动从服务器获取更新。
以前也可以这样做,但是网页必须询问是否有可用的更新。使用SSE,更新会自动出现。
例如:Facebook / Twitter更新,股价更新,新闻提要,体育赛事结果等。
-
浏览器支持:

-
EventSource对象用于接收服务器发送的事件通知:
var source = new EventSource("demo_sse.php");
source.onmessage = function(event) {
  document.getElementById("result").innerHTML += event.data + "<br>";
};
🌰说明:
- 创建一个新的EventSource对象,并指定发送更新的页面的URL(在本示例中为“ demo_sse.php”)
- 每次收到更新时,都会发生onmessage事件
- 当发生onmessage事件时,将接收到的数据放入id =“ result”的元素中
-
在上面的tryit示例中,有一些额外的代码行可以检查浏览器对服务器发送事件的支持:
if(typeof(EventSource) !== "undefined") { // Yes! Server-sent events support! // Some code..... } else { // Sorry! No server-sent events support.. } -
为了使上面的示例正常工作,您需要一台能够发送数据更新的服务器(例如PHP或ASP)。服务器端事件流的语法很简单。将“ Content-Type”标头设置为“ text / event-stream”。现在,您可以开始发送事件流了。
PHP中的代码(demo_sse.php):
<?php
header('Content-Type: text/event-stream');
header('Cache-Control: no-cache');

$time = date('r');
echo "data: The server time is: {$time}\n\n";
flush();
?>
ASP(VB)(demo_sse.asp)中的代码:
<%
Response.ContentType = "text/event-stream"
Response.Expires = -1
Response.Write("data: The server time is: " & now())
Response.Flush()
%>
代码说明:
- 将“ Content-Type”标头设置为“ text / event-stream”
- 指定页面不应该缓存
- 输出要发送的数据(始终以“ data:”开头)
- 将输出数据刷新回网页
-
在上面的示例中,我们使用onmessage事件获取消息。但也可以使用其他事件:
Events Description onopen When a connection to the server is opened onmessage When a message is received onerror When an error occurs
HTML reference
在使用中有什么需要参考的,就戳👉html reference进行查找。
🎉终于把周末来临之前把HTML教程全部看完啦!这样周末两天就可以开始CSS学习啦!
HTML的内容真的很多很多,看一遍就忘,只能以后在做项目的再来加深印象啦!🥰